Quite a few people have emailed us about our approach to photography on the road, the kit we use and hints / tips on taking photographs. Instead of sending separate emails we thought we would share with you our own experiences and thoughts on this subject.
Non-camera specific points (and probably most important):
1) If you don’t have your camera handy (and ready) you will not be able to take pictures – so always try to keep it close – especially for quick shots like animals, situations and people.
2) Take lots of photos and I mean a lot! If you want some great pics you should just click away and then look at the best ones on your PC / laptop later - its well easy to discard the not so good ones but amongst them you will find a real gem pic. For every 50 pics I take I probably get 10 “so so” ones and probably one or two good ones. Also do bursts of pics with people shots (bursts of 3 per shot) it helps avoid that "closed eye" look.
3) Speak to people about what you want to do and the kind of trip you are going on. Visit your local camera shop and have a chat and I would strongly recommend go to a pro camera shop. Even if you are not spending $1000s on kit they normally employ people that have a passion for photography and whilst it may feel a bit embarrassing when you first go in they will spend time with you and chat about the options you could make kit wise. Trust me, you can learn a lot from the pro’s and any photographer worth his salt will share a few gems of knowledge that will help you develop your own style over time.
4) If you have a basic photo editor (most PCs do) or it comes with camera software.... practice with it before you leave and focus on "cropping" pics. This gives you a better framed pic and allows the subject to stand out...most of my better pics are cropped images.
5) You don’t need fancy software like Photoshop to get good pics.... in fact I am anti-Photoshop. Go for natural looking pics. Natural poses with people and kids playing or interacting naturally is best and get low down to their level as it helps to change the look of the pic
6) Black and white is (for me at least) the best "colour" to use for people. Its warms up skin tones and you loose that "red cheek / red eye" look that you get if you shoot in colour - esp. with a flash. B&W sometimes looks odd but practice makes perfect. I never use flash as a rule full stop
7) Avoid taking pics indoors and at midday - natural / warm light is best. Shoot in the early morning or late afternoon with the sun just shining on the face (avoid squinting).... natural light is best for people shots. Dark skin tones need some light to bring out features and note that most African people’s faces will simply be under exposed in the mid-day sun!
8) When shooting tribal / local people ALWAYS ask permission and spend time talking and interacting with them before you pop your camera out. With kids, play a game and gain their confidence. With adults, explain your trip and a bit about your trip and why you want to take their picture, ask the village Chief or village elder if it’s OK – they normally say yes and it’s a mark of respect that you ask them. That way you get less “staged” photos and less “formal looking” pictures.
9) If you value your pictures (memories) BACK UP your pictures on a separate hard drive. We use the Iomega 500GB drive which is about the size of 2 packs of cigarettes. The Mac back up process (Time Machine) is the best I have seen to date and makes life very easy indeed when it comes to performing this task.
10) Keep your back up hard drive safe and in a dust and shockproof carry case. There are some great ones available from the likes of Case Logic.
Camera specific points
1) Decide what kind of photography you want to do – People, Wildlife, Landscape, Specialist etc..etc… as this will help you in your camera purchase. You may have already developed a style you like and know what equipment you want but before starting on a 1+ year overland trip (which could be the biggest trip you ever do in your life) so think about what images you want to capture and how you want to use them.
2) Try and get the highest resolution sensor camera your budget will allow. Basic but good DSLR cameras start at £300 ($500) and are pretty good entry points for most people. Buy the body first and add lenses as you go. Reason being you can begin to start to get the right kit for the kind of pics you want to shoot. Canon and Nikon both sell “kits” i.e. a body with a good mid range mini-zoom lens (in the range of 30mm-150mm) a good all rounder and a good starting point
3) There is a lot of competition in the market and camera prices and specs change almost daily. Amazon, Jessops & London Camera Exchange are good places to shop for gear and don’t be afraid to ask for discounts by waving around other prices from the web if you buy from a shop – price matching is common.
3) Next you will need a lens, again the choice is bewildering. For people shots go for a mini zooms...Canon EF-S 18-55mm or similar (get it second hand) EBay is good for this. It’s a good all rounder for people and places. People tend to look after all their kit so surfing for good second hand ones can save money. This may take you over your budget but it’s worth it. For wildlife you will need a bigger zoom lens – try and get a combined lens say 80-300mm or 100-400mm that will give you a range of options for medium to long range pics. For more specialist effects like wide angle, fish eye there are lots of choices and prices start to get more expensive – anything between 16-35mm will be good for this kind of shooting. As a rule - the better the lens, the more light it will let in and the better the image quality you will attain. Also, consider an anti glare hood – most lens come with them these days for helping removing sunbursts and flares.
4) Get a tripod if you want to do long exposure or long shots in low light conditions. Get one that has a wide footprint and will be stable. Manfrotto make some great modular tripods with a wide range of interchangeable adaptors, heads and grips.
5) Buy a polarising filter – brings out blues and helps cut down glare. Helps with contrast in skies with clouds and can really add some nice effects to B&W pictures. It’s also worth buying a basic UV filter (basically protects your lens glass) and a camera bag to protect and carry kit (Lowe Pro probably have the best range but there are many to choose from)
6) Buy a book on DSLR photography - you can get a lot of hints and tips off the web on settings etc.....as well as forums. The key things to focus on are settings such as aperture, shutter speed, film speed ISO, depth of field, AWB, exposure compensation and lighting. Try and shoot with these factors in mind and move away from using the camera’s “auto” shoot modes.
7) Practice Practice and PRACTICE!! Play with your camera and test shoot on different settings. Simply go for a walk and take pics of all sorts of things to get a feel for the camera settings. Eventually you will find a mode you prefer shooting in.
8) Most DSLRs have a "live view" mode, it’s useful to a point but I would practice with the eyepiece, it will also save a lot of battery power
9) Buy a second battery and always make sure its charged – it’s a real pain when you run out of charge and cannot keep taking pictures!
10) A lot of DSLR cameras now can shoot stills and movie footage (top end bodies can shoot HD film). If you were thinking of buying a separate Video Camera I would strongly advise you spend that money on a better / higher end DSLR can that can do both. You end up getting more for your money and will carry one less item of gear in the van!
I always get asked – what gear do you use, well the answer is as follows;
- The workhorse is a Canon 5DMKII body (shoots HD movie and has a 20MB, full frame sensor) – it’s a semi-pro model and probably not in most people’s budgets BUT its helped me take my photography to a slightly higher level of quality than my older 350D
- I use a small Canon IXUS for “in the pocket” quick pics / basic movie footage
- Canon 16-35mm wide angle L Series lens
- Canon 24-105mm mini zoom L Series lens
- Canon 100-400mm zoom L Series lens
- Canon 2x converter for doubling up on the 100-400mm (makes it 200-800mm)
- Manfrotto tripod with round head and pistol grip handle with quick release mount
- Lowe Pro Fastback 300 camera case – has laptop compartment, and is small enough to be of a manageable size while walking etc….but ca carry all my main kit & lenses
- Hoya filters, spare battery, cleaning cloths, rubber hand pumped dust remover
- Wireless remote for Bulb and distance self timer shots
- Buy the BIGGEST and fastest memory card you can afford!!!!! I use Lexar Professional UDMA CF 16GB cards rated at 300x Speed.
- Computing: 15” Mac Book Pro laptop with 500GB HD and Iomega 500GB portable drive
- Software: Apple’s iPhoto for all JPEG pics and Apple’s Apeture software for RAW files
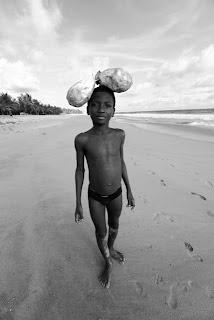
Preferred shooting mode
I shoot 90%+ in Av (aperture) mode and 80%+ of my pics are B&W. They always say "photography is all about light" and its true.... the more light you let in the more you can do with the image, so controlling this is what I focus on. My personal settings for my B&W pics are:
1) Style Monochrome
2) Switch on red filter (this is a setting in the camera..... It mimics what the traditional filter you would have attached in the old days – great for skys / clouds / high contrast
3) Increase contrast and sharpness settings depending on what you like
4) Shutter speed is then dictated by the Av setting - the smaller the Av number the bigger the hole in the camera and the more light you let in and the faster the shutter speed.... read up on this and have a play.... depth of field is important for people shots.... and this setting also helps controls depth of field.
5) I shoot in JPEG mode (mainly) as the camera produces very good compressed JPEG files of around 5-7MB. You will also hear people say ALWAYS shoot in RAW format. This depends. If you have a high res camera you can afford to shoot in JPEG.... the 5DMKII will take a 20MB RAW file and then compress it to make a pretty large JPEG image. This mode is suitable for most home / shop printing up to A3 and they can be edited on a basic PC using simple software. If you want to make bigger prints or selling your images or want big blow-ups greater than A3 you will need to shoot in RAW and post process the images using something like Photoshop
6) Apart from some small contrast or exposure changes I do very little if no post processing. I try and aim to capture the image I want there and then and when you are on the road processing 100s if not 1000s of RAW image files is a pain. Plus, if you can find a dust free place to sit down in Africa for any length of time – please let me know ;-)
My “dream” set up
I would love Canon’s 1D MKIV – it’s their top end pro camera and an absolute gem to use. I would also love to have a range of prime lenses i.e. fixed focal length lenses but these tend to be expensive. They have bigger aperture ranges letting in lots of light and made to a very high degree of quality. The less “glass” you have between the sensor and the subject the better the image you can create. One day eh!!
And finally.........
People take pictures NOT cameras.... the camera will do a lot of work for you but its YOU that takes the picture. I like the quote from one my own photographic heroes Robert Capa “If your pictures aren't good enough, you aren't close enough". Kind of sums it all up really.
If you would like to view some of our travel pics please click here.
Enjoy!!
Nick
Stonehenge to Cape Town 2010/11
Tripods & Heads by Manfrotto


