Pages

Showing posts with label planning. Show all posts

December 27, 2011

Africa Overland - Top 10 Planning Hints & Tips

Hi Folks,

Now our trip is over, we have taken some time to update our website and Blog with data you might find useful for planning purposes (applicable to any country for an extended trip).  You can see our full FAQs list at our website

In the meantime, check out our summary Top 10 lists you might want to consider - we would love to hear more Tops 10's from other people.

What were the top 10 most useful items you took?
  1. Water filter - Hands down the best investment
  2. Multi-fuel stove - Efficient, don't need to fiddle with gas
  3. The COBB - Great for slow cooking, bulk food, BBQ, roasting & making pizzas!
  4. Vehicle Side Awning - Sun shade in tropics is essential
  5. Roberts SW Radio - Great for BBC World Service, news & African programmes
  6. Vehicle mounted side table - handy & space saving for cooking, esp. in rain
  7. Rear mounted tap - great for convenient washing of hands / kit / utensils
  8. Hennessy Hammocks - nice alternative place to sleep, lie down on hot days
  9. Caravan power hook up - power was available in a lot of places (eases battery drain)
  10. SPOT Messenger - Excellent for location tracking, keeping friends & family up to date
What were the top 10 least useful items you took?

  1. Camp Kitchen table - odd shape, bulky (we gave it away)
  2. Roof rack bag - Initially good, but leaked and rotted in sun (metal roof box better)
  3. Thermarests - never used, lent them to people once
  4. Large rucksacks - bulky, took up space, used once, used shoulder bags
  5. Money belts - never carried wallet, not needed (carry cash that you need)
  6. DC / AC converter - ours was a cheap one (not Sine Wave) buy better one next time
  7. Two way radios - only useful if other people know how to use them & switch them on!
  8. Board games - packed too deep in locker, pain to get out
  9. Random tools - took too many and hardly used them
  10. Lots of adaptors - took too many attachments, mainly used British plugs on multi-gang
 What were the top 10 things you would do differently next time?

  1. Don't rush! - You are on a journey of a life time, so take time to "stop" - we still spent 1 year on the road and in some countries wished we had stayed for longer
  2. Realise that it takes time to adapt from "9-5 normal life" to 1 year on the road - it takes approx 6-8 weeks to get used to life on the road - its not a holiday ;-)
  3. Have improved storage in vehicle - we rushed our system / it self destructed!
  4. Sit inside / sleep in vehicle - It does get cold in Africa, good to be able to keep warm, get out of rain / damp.  Its also nice to have some privacy sometimes.
  5. Have roof tent open over the rear - its 50:50 on this - you gain shade at back
  6. Make sure its easy to get to fridge !!
  7. Try not to pack things in too many boxes - they take up space.  Lockers are better.
  8. Take Blue metal water jerry cans - The Black plastic ones leak
  9. Take a spare alternator - It was the one item we should have packed
  10. Might consider alternative Malaria prophylaxis (just take test kits / treatment)


Nick and Vick
Stonehenge to Cape Town 2010/11
48,361km in 366 days
Twitter             https://twitter.com/langebaansunset
Photography     http://www.redbubble.com/people/langebaansunset
Film                 http://youtube.com/LangebaanSunset


Importing 4x4 into South Africa Duty Free (Returning South African)

Hi folks, if you are reading this, you are either about to embark on an overland trip, taking part in one or just about to complete one. Either way, if you are a returning South African (like my wife) we want to share our experience of importing our Land Rover duty free into SA after our London to Cape Town trip 2010/11.  This process is likely to be the same for a motorbike or truck traveling on a Carnet but as rules change, this is now possibly out of date.


We offer the following is a summary / check list for any returning South African citizen that has a foreign registered vehicle and wishes to import it into SA free of duty. There are several things that you need to consider BEFORE you set out as there are some items that need to be addressed in your departing country before you set out on your journey if you want to avoid a lot of hassle when you get here. Even though there are various guidelines available on this process, things "on the ground" are often different and even our clearing agent in Cape Town had to jump through a few hoops.

STEP 1 - Key items to have sorted before you depart

MOST IMPORTANT FOR THIS SCENARIO: The car has to have been registered in the SA citizens name for at least 12 months prior to returning to SA, so make sure the registration papers reflect this. Other import scenarios may have different rules and rules change!

- Original SA Passport (or IF dual citizenship, foreign passport) of returning SA citizen should clearly state departure and arrival times stamped in the passport of when you came into country and when you left SA – THIS IS KEY!
- Even if the entry date is on an old passport – bring the old passport with you otherwise you will have to produce an authorised affidavit to cover any discrepancy.
- Letter confirming employment by foreign employer – this has to be an original and signed / dated. Copies will not be accepted. Get at least 2 signed originals just in case your paperwork gets lost in the system!
- Letter confirming resignation or no longer employed by foreign employer – again suggest 2x originals, signed and dated
- Valuation certificate of car – this seems to be a grey area. You can go and get a trade in valuation done and have it written on official letterhead of the garage that did the valuation (ideally a dealer in your marque)
- Your ID book – Needed as additional proof as SA National
- Intl Certificate of Motor Vehicle – you can get this from your country where the car is registered – UK AA in our case
- Registration Certificate from the cars normal place of origin (registration documents V5C in the case of UK)
- De-registration as a taxpayer – when you leave your country you have to let the Inland Revenue know that you are leaving. There is a form for this and you will need a copy of this form. It will have to be certified as an original copy (by police or lawyer)
- Carnet – You will / should have this for your journey anyway. For those people that hope / plan to travel and get into SA with a fake Carnet – good luck!! Based on the process we went through it would be HIGHLY unadvisable to try this!!

STEP 2 - Procedure once you get to SA

At port of entry you only need to get the Carnet stamped into SA when you finally get here (i.e. the entry stub stamped) – same process for all the other countries you visited along the way.

You do not need to fill in any forms at the border with regards the car import process. We even asked about this at the time and they simply refused to discuss it saying the Carnet “entry” stamp was all that was needed.

The following forms / process need to be followed

- Form DA304 : Motor Vehicle Declaration from SARS
- Form P.1.160 : Declaration in Respect of Unaccompanied Manifested Effects Entered Under Rebate of Duty
- Compliance Certificate (Issued by Manufacturer)
- Letter of Authority (Which will have to be applied for by the NRCS)
- Import Permit (Which will have to be applied for by ITAC)


There will then be the possibility that you will need a Customs Exam of the Car, this is at Customs discretion AFTER perusal of your Carnet. Even if you are told that this is required, it maybe cancelled at the last minute. We did not have to have one in the end.

A provisional payment may also be requested as surety for the duties and vat applicable, again at customs discretion so be prepared for this.


You are aiming to get your Carnet exit stub stamped by SARS – this is key if you are to discharge the Carnet and get your Bank Guarantee / Security Insurance / Deposit cancelled.

Even though we had all of the above, we still had to get an affidavit stamped by the SA police to state that the dates of residency in the UK for the SA National and to cover a discrepancy on the passport (the wife’s old passport with this info in had been destroyed)

STEP 3 - Procedure once you complete all the paperwork

When this process is over – it can take up to 2 months – you get the following back from Customs:

- Stamped Carnet – exit stub is stamped by SARS / customs
- Customs Release Notification
- SAD507 Customs declaration form
- SAD500 Customs declaration form
- Copy of NRCS Letter of Authority
- Copy of Import Permit Notification
- Copy of completed DA 304A Motor Vehicle Declaration from SARS
- Stamped original of DA304
- Stamped copy of your declaration of particulars
- Stamped copy of affidavit we submitted
- Your original vehicle registration papers

You are now able to go and register the vehicle in SA.  We posted the Carnet back to RAC UK and emailed copies of the SARS release form (we made a copy for our records).

So how did we do it / what did it cost?

When we got to SA we hooked up with a logistics / import company when we finally finished the trip – Why? Well, the above process is not that simple. Anyone that has dealt with “officialdom” in SA will know 3 things:

1) You are going to spend a lot of time waiting and finding offices etc…..
2) You are likely to be dealing with people unfamiliar with the process (the process can appear to vary from person to person on any given day!)
3) Paperwork can / may get lost and no one is really going to look too hard for it

The benefit of using an agent is they already have established relationships with all the people needed to get the car released, they know the process / forms and they can minimise the amount of time and cost spent driving / calling around to various offices to chase paperwork etc….This is important if you have limited time or are spending time travelling elsewhere when you get here.

We used Ashraf at IQSA and he was VERY helpful and professional. Whilst there is a fee associated with the service, we felt it was worth paying. We saved a lot of time & money simply on fuel costs for driving in and out of Cape Town to various places to get things sorted. We would highly recommend him!!

Mr Ashraf Mallick
IQSA Logistics

Cape Town, South Africa
Tel : + 27 21 697 5443
E-Mail : ashraf@iqsalogistics.co.za


Costs

Certification & Bill of Entry = R3,135 = £250
Service Fees & misc costs = R1,824 = £145
Postage of Carnet back to UK = R64 = £5

Nick and Vick
Stonehenge to Cape Town 2010/11
48,361km in 366 days
Twitter             https://twitter.com/langebaansunset
Photography     http://www.redbubble.com/people/langebaansunset
Film                 http://youtube.com/LangebaanSunset

July 22, 2011

Our medical kit & health on the road


Introduction
We have just spent 1 year travelling overland in a Land Rover in Africa and wanted to share with you our medical / health care tips.
Hygiene & Basics
Two overriding issues you have to think about are clean drinking water and basic body hygiene.  Bugs love Africa!!!  We used a charcoal / ceramic water filter and filtered all water we consumed orally.  We never got seriously ill and only had a couple episodes of "50:50" number 2 action.  We also washed our hands and tried to have flannel washes when water was low or no showers were handy (that's quite often in Africa).  Bottom line, keep clean and drink clean water and you minimise a lot of problems.  Also, if you cut yourself, clean it and treat it quickly with Savlon or Savlon spray.  Cover up feet, ankles and arms in the evening.  We only used DEET on our clothing and tried to avoid spraying it on our skin.  
Injections
We also had all our jabs done well in advance - we had approx' 7 visits to the local clinic in the UK.  Visit your GP and chat with the nurse.  They have access to MASTA and can advise what you need based on your route.  You will need Yellow fever certificate and a list of the jabs you have had, it does get asked for in Africa, esp. Nigeria!!
Reading
We took the Lonely Planet pocket health book.....VERY good buy and it helps give you a second opinion if you are a solo traveller.  Its small enough to pack in a bike too.  We looked at this a lot!!


What medical kit did we take?
We have listed the main items we took.  They were packable into 3 small bags (pictured).  We kept a basic kit in the front cab and the smaller medical kits were kept in the shade / cool part of the vehicle.  We kept our malaria pills, text kits in the fridge.  We have tried to indicate the frequency of usage too as a rough guide. 


  • Doxycyclin tablets Malaria prophylaxis - used daily
  • Malarone tablets Malaria treatment   (4 Tablets in one dose for 3 days) - not used
  • Canesten / Clotrimazole cream Topical cream for vaginal / skin fungal infections - used
  • Vagisil cream Treatment for vaginal irritation - not used
  • ASPAR / Hayleve antihistamine tablets Treatments for hay fever & allergies - used
  • Hydrocortisone / Eurax Topical cream for non infected itchy skin rashes - used
  • Mycil / Daktarin cream & Daktarin Powder Anti fungal treatment for athlete’s foot - used
  • Chloramphenicol antibiotic ointment Infected eyes / bacterial conjunctivitis treatment - not used
  • Safyr Bleu Eye irritation liquid drop treatment - used
  • Savlon Pavidone spray Treatment of skin wounds, abrasions - used this a lot!
  • Sodium Chloride solution ampules Washing of small wounds - used
  • Cetrimide / Germolene / Savlon antiseptic creams Treatment of minor cuts - used this a lot
  • Calamine cream Treatment of sunburn & windburn - used
  • Ibuprofen tablets Musculo skeletal pain relief / anti-inflammatory  - used a lot
  • Paracetamol tablets General pain relief / headaches - used
  • Lemsip powders Treatment for flu - used
  • Friars Balsam liquid, Sudafed tablets, Strepsil sweets Treatments of colds / cold decongestion - used the latter
  • Senokot tablets (laxative) Treatment for constipation - not used
  • Normalone / Imodium tablets Antidiarrhoel treatment - used once
  • Electrolade powders sachets Rehydration treatment - used several times
  • Haemorrhoid suppositories Treatment of hemorrhoids / pain relief - used once
  • Bisodol (tablets) Antacid treatment - used
  • Aquatabs tablets Emergency water treatment - not used
  • DEET - used sparingly and generally on clothing
Medical Hardware
  • NOMAD Sterile kits x 3 - used some items from these kits
  • Dental kit x1 - never used
  • Malaria near Patient Test Kits - used once for another person
  • Compeed blister pack x1 - used once
  • Tapes (various) - used Antiseptic wipes (various) - used
  • Latex gloves (various) - used
  • Rehydration spoons x2 - used once
  • Plasters, bandages & burn dressings (Various) - used
  • Wound dressings (various) - used
  • Steri-strip wound closures (various) - not used
  • Tweezers - used Scissors x2 - used
  • Thermometer - used Safety pins - used
  • Emergency foil blankets x2 - not used
  • Emergency glow sticks x2 - not used
  • Blood donor cards - reference only BUT good to know your blood group
What conditions did we get?

On the whole we only had minor complaints that were easily treatable:

Thrush, blisters, sunburn, athletes foot, headaches, dehydration, flu, 1x skin infection from mossie bite, a few boils, 1x hemorrhoid (old age).  We both suffered from sun sensitivity from using Doxycyclin tablets.  This was worse at the equator.

What extra medicine did we need?

We bought some Cyprofloxicin (for treating skin infections) in Mali.  Easily obtainable and good for treating infected bites and boils.

Nick and Vick
Stonehenge to Cape Town 2010/11
48,361km in 366 days
Twitter             https://twitter.com/langebaansunset
Photography     http://www.redbubble.com/people/langebaansunset
Film                 http://youtube.com/LangebaanSunset

Our budget - 1 Year in Africa, 2x people + 1x4x4


Introduction

The budget is probably the biggest question you ask after you have solved the “where are we going” and “what vehicle are we taking”.  It’s perhaps the one we spent several months researching.  We found there was a real lack of detail when it came to showing where and how you spend your money on a trip like this so we made a detailed record on the trip and the data is presented below.  We hope you find it useful. 

Overview of spending
The costs below include EVERYTHING we spent on the trip once we started travelling.  It covers fuel, visas, food, tourist stuff, communications, fines, bribes, taxis, eating out etc...etc... BUT excludes all pre-trip costs / vehicle prep which are covered lower down this page.


Fuel was the main expense followed by eating out, accommodation and food shopping.  You could clearly lower the amounts you spend on eating out and accommodation, especially if you wild camp (see below) but to be honest, we found that after a long day of driving, sitting in a bar, eating local food and having a chat means you leave your “overland bubble” and interact with people more.  If you ate out less you would cook more so there is some give and take on this aspect of the spending. 

What kind of accommodation did we have on the trip?


What had we planned to spend Vs what we spent?

From our experience for 2x people and 1x 4x4 you need to be thinking of somewhere between €45-€60 per day for EVERYTHING for a year in Africa, and that includes being able to "relax", have the odd night in a hotel, enjoy a variety of tourist experiences, buy gifts, eat a healthy diet and treat yourself to the odd "blow out".  We had set an original budget of €49 / day and found we were on target for that by the time we reached Northern Namibia.  North, West and Central Africa were relatively cheap.  The charts below give you a feel for the spending we incurred for the whole year.  


Southern Africa is a lot more expensive and if you want to do tourist "stuff" it starts to add up and so we started to deviate away from the planned budget.  This is even more so if you hit the school holidays or want to visit some of the famous / popular parks.  


We ended the trip after 366 days with an average spend of €58 / day.  For people travelling on foot, by bike, motorbike etc...Budgets will vary from ours and will also vary for different regions of the world.  Africa is not as cheap as you might think.
Types of budget 

During the year we met a few overlander folk doing similar trips to ourselves.   It was a lot quieter on the west coast route.  We did hook up with some of them and travelled some sections together but most of the time we were on our own.  We found from these experiences that the people appear to fall into 3 main types of budget (based on 2x people & 1x4x4), you might want to consider this “rough” assessment as a means to measure your own plans Vs what you can expect on the trip. 
1) Minimal Budget <€40 / day
People on this kind of budget have trip that is dominated by juggling an extremely small budget with very little if no contingency.  These people tend to spend most of their time doing things on the cheap and when the cash runs out the trip is over in what ever country they happen to be in.  They tend to be travelling without proper paperwork, a vehicle that needs constant attention or repairing and day-to-day activity seems to focus on finding the cheapest source of food or hanging around back street garages haggling for something to be welded or scrounged.  There is little if no spare cash for gifts or tourist related activity and when you hook up with them you tend to find that you quickly become a surrogate contributor towards the things they don't have (after a while this becomes a real pain and very tiresome).  We also found they tend to be poorly equipped and are not really set up to travel off-road without support.  Sadly, and whilst its not a universal observation, we did note that their budget had a major impact on how they travelled and also (in the case of 3 couples we met) their attitude to other people they came into contact with.  There seemed to be a strange (competitive) focus on who can travel the furthest for the least amount of cash, which in our view, is not what the trip is about. 

2) Realistic Budget €45-€60 / day
This group of people have a budget that has sufficient cover for a range of activity on the trip including site seeing, tourist stuff, gifts and contingency for vehicle repairs / things going wrong etc....  They tend to be well prepared with a reliable vehicle and have sufficient equipment to travel remotely / off the beaten track without support for extended periods of time.  The trip can accommodate some changes along the way and pace of travel is slower and more relaxed.  Accommodation tends to be simple and realistically priced with a focus on camping / bush camping with occasional stays in hotels / eating out as a treat.  The end date is fixed or flexible and the budget will see them through to the end, even if some mechanical work is needed along the way.  
3) Money No Object Budget >€60 / day

This group of people have a massive budget that has sufficient cover for pretty much anything.  They can change their plans at will and can afford to stay in top end campsites / hotels on a more frequent basis.  They can undertake more expensive site seeing / tourist stuff and have a pretty large contingency for vehicle repairs / things going wrong etc....  They tend to be very well prepared with a high-end vehicle and have sufficient equipment to travel remotely / off the beaten track without support for a considerable period of time.  Pace of travel is very relaxed.  Have the ability to eat out regularly and the end date is flexible.

Pre-Trip costs

The day-to-day budget previously discussed is often linked to what you have left over after you have spent your hard earned cash on the vehicle, its preparation and pre-trip spending.  The figures below are good estimates based on getting a sound base vehicle, fitting it out to basic but reliable level with mainly new equipment and the obligatory paperwork / medical kit.  Other costs are included too. Key areas to consider are:
  1. Base vehicle cost in 2006: 10-12 year old Defender 110 with 100k+ miles (unmodified): £3k - £5k.  We note that you can pick up some good deals in the LRO / LRM magazines as people appear to off-loading vehicles at discounted rates at present - so happy shopping!  Take vehicle to a dealer for a 30 minute check over.  For Land Rovers key areas to focus on are oil and water leaks from engine, condition of cooling pipes, leaks from diffs and gearbox.  Clunking noise from UJ wear on drive shaft, play in drive shafts, condition of radiator and alternator, tyres, check shocks for leaks, rock car to check for bearing wear, check for welds on drive member ends, condition of springs (especially rear springs) and service history.  Check for dates and mileage when Cam belt timing chain was changed and also the last time the serpentine belt was changed. 
  2. Mechanical work, service, MOT, misc repairs, labour & VAT: £2k - £3k.  Can’t stress that having this done is key unless you can do it yourself, you learn a lot on the trip!!!
  3. Basic (new) overland vehicle equipment, preparation, labour & VAT: £10 - £12k.  We got new equipment mainly because it lasts and we are glad we did.  The sun and heat kills fabrics and does strange things to plastics.  Kit we used the most includes, gps, tyre compressor, waffle boards, winch, winch accessories, awning, roof tent, water filter, SPOT messenger, jerry cans, extra fuel tank, extra water tank, Engel fridge, fuel sedimentor.  The role cage was an added extra but one we felt was a good investment.  
  4. CARNET depends on the value of your vehicle and where you go - expect paperwork to cost £250 (ish) and depending on the security an extra £300 (ish) to cover this.
  5. Visas, medical, paperwork, misc administration £2k
  6. Other big costs: We sold our house and imported the vehicle into SA when we arrived.  This means we did not need 2 x flights home or shipping costs (this could cost approx £3500). 
  7. Importing a car for a returning South African on a one-way trip like ours costs about £500 (ish). We will post a report on this when complete.
  8. If you rent out your house furnished there will be admin costs etc ....while you are away and additional storage costs if you rent it out unfurnished that could add another £1-3k to your cost base, especially if you have to pay to store items.
As you can see, costs add up quickly, but they are realistic and based on real quotes / research.  Labour and VAT are a big factor if you are getting a lot of new parts and someone to fit them.  One thing we have observed, and many overlanders do comment (retrospectively) that they wish they had spent more £££ upfront and not cut corners or bought a vehicle already prepared with all the gear.   We have heard a couple of accounts where the trip was a nightmare because things went wrong in a big way!!  e.g. $2000 to get a tow for a broken down car in Central Africa, paying $500 for your vehicle NOT to be fixed at a back street garage and on top of that having your laptop nicked while it was in the garage.  It seems expensive at the start BUT finding parts and getting things fixed if there are MAJOR mechanical issues along the way is not easy in remote parts of Africa. So spend money on getting the car fixed up before you go.


Conclusion


Everyone is different and what you spend on your trip will vary from the above based on your mode of travel, location and spending habits.  The overall lesson we learnt is that it does help to SET a budget and TRY and stick to it BUT allow yourself some wiggle room.  Eating bread, drinking water and starving yourself does not really save you that much money in the long run and we found having the odd blow out is a treat worth waiting for.   The flip side to this is you can actually become ill and then you have to spend money on medicines etc...  A year on the road is longer than you think and its takes it toll in more ways than one.  Good hygiene and a good medical kit are areas to focus on and mitigate costs, the water filter was the best buy as we rarely got ill.  The vehicle prep is key and having a basic level of kit is important.  Whilst you can get spares on the way, it takes time and money to find them.  What you spend up front, saves you money in the long run and we would be very sceptical about couples who tell you you can survive in Africa on $25 / per day travelling in a 4x4 to remote locations like we did.  Survival Vs having a good time / exploring are two different things!


We hope you find this article useful and would welcome any feedback on your own budget Vs what you spent Vs where you went Vs duration of the trip.  We would like to compile a summary and share this via Overland Live.  Please email data to me at: nick @ langebaan-sunset.com


Thanks


Nick & Vicki
www.langebaan-sunset.com
Stonehenge to Cape Town 2010/11


February 11, 2011

Overland Photography


Quite a few people have emailed us about our approach to photography on the road, the kit we use and hints / tips on taking photographs.  Instead of sending separate emails we thought we would share with you our own experiences and thoughts on this subject.


Non-camera specific points (and probably most important):

1) If you don’t have your camera handy (and ready) you will not be able to take pictures – so always try to keep it close – especially for quick shots like animals, situations and people.
2) Take lots of photos and I mean a lot!  If you want some great pics you should just click away and then look at the best ones on your PC / laptop later - its well easy to discard the not so good ones but amongst them you will find a real gem pic.  For every 50 pics I take I probably get 10 “so so” ones and probably one or two good ones. Also do bursts of pics with people shots (bursts of 3 per shot) it helps avoid that "closed eye" look.
3) Speak to people about what you want to do and the kind of trip you are going on.  Visit your local camera shop and have a chat and I would strongly recommend go to a pro camera shop.  Even if you are not spending  $1000s on kit they normally employ people that have a passion for photography and whilst it may feel a bit embarrassing when you first go in they will spend time with you and chat about the options you could make kit wise.  Trust me, you can learn a lot from the pro’s and any photographer worth his salt will share a few gems of knowledge that will help you develop your own style over time.
4) If you have a basic photo editor (most PCs do) or it comes with camera software.... practice with it before you leave and focus on "cropping" pics. This gives you a better framed pic and allows the subject to stand out...most of my better pics are cropped images.
5) You don’t need fancy software like Photoshop to get good pics.... in fact I am anti-Photoshop.  Go for natural looking pics. Natural poses with people and kids playing or interacting naturally is best and get low down to their level as it helps to change the look of the pic
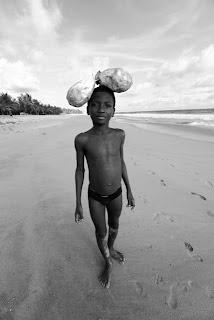
6) Black and white is (for me at least) the best "colour" to use for people. Its warms up skin tones and you loose that "red cheek / red eye" look that you get if you shoot in colour - esp. with a flash.   B&W sometimes looks odd but practice makes perfect. I never use flash as a rule full stop
7) Avoid taking pics indoors and at midday - natural / warm light is best. Shoot in the early morning or late afternoon with the sun just shining on the face (avoid squinting).... natural light is best for people shots.  Dark skin tones need some light to bring out features and note that most African people’s faces will simply be under exposed in the mid-day sun!
8) When shooting tribal / local people ALWAYS ask permission and spend time talking and interacting with them before you pop your camera out.  With kids, play a game and gain their confidence.  With adults, explain your trip and a bit about your trip and why you want to take their picture, ask the village Chief or village elder if it’s OK – they normally say yes and it’s a mark of respect that you ask them.  That way you get less “staged” photos and less “formal looking” pictures.
9) If you value your pictures (memories) BACK UP your pictures on a separate hard drive.  We use the Iomega 500GB drive which is about the size of 2 packs of cigarettes.  The Mac back up process (Time Machine) is the best I have seen to date and makes life very easy indeed when it comes to performing this task.
10) Keep your back up hard drive safe and in a dust and shockproof carry case.  There are some great ones available from the likes of Case Logic.


Camera specific points

1) Decide what kind of photography you want to do – People, Wildlife, Landscape, Specialist etc..etc… as this will help you in your camera purchase.   You may have already developed a style you like and know what equipment you want but before starting on a 1+ year overland trip (which could be the biggest trip you ever do in your life) so think about what images you want to capture and how you want to use them.
2) Try and get the highest resolution sensor camera your budget will allow.  Basic but good DSLR cameras start at £300 ($500) and are pretty good entry points for most people. Buy the body first and add lenses as you go.  Reason being you can begin to start to get the right kit for the kind of pics you want to shoot.  Canon and Nikon both sell “kits” i.e. a body with a good mid range mini-zoom lens (in the range of 30mm-150mm) a good all rounder and a good starting point
3) There is a lot of competition in the market and camera prices and specs change almost daily.  Amazon, Jessops & London Camera Exchange are good places to shop for gear and don’t be afraid to ask for discounts by waving around other prices from the web if you buy from a shop – price matching is common.
3) Next you will need a lens, again the choice is bewildering.  For people shots go for a mini zooms...Canon EF-S 18-55mm or similar (get it second hand) EBay is good for this.  It’s a good all rounder for people and places. People tend to look after all their kit so surfing for good second hand ones can save money. This may take you over your budget but it’s worth it.  For wildlife you will need a bigger zoom lens – try and get a combined lens say 80-300mm or 100-400mm that will give you a range of options for medium to long range pics.  For more specialist effects like wide angle, fish eye there are lots of choices and prices start to get more expensive – anything between 16-35mm will be good for this kind of shooting.  As a rule - the better the lens, the more light it will let in and the better the image quality you will attain.  Also, consider an anti glare hood – most lens come with them these days for helping removing sunbursts and flares. 
4) Get a tripod if you want to do long exposure or long shots in low light conditions.  Get one that has a wide footprint and will be stable.  Manfrotto make some great modular tripods with a wide range of interchangeable adaptors, heads and grips.
5) Buy a polarising filter – brings out blues and helps cut down glare.  Helps with contrast in skies with clouds and can really add some nice effects to B&W pictures.  It’s also worth buying a basic UV filter (basically protects your lens glass) and a camera bag to protect and carry kit (Lowe Pro probably have the best range but there are many to choose from)
6) Buy a book on DSLR photography - you can get a lot of hints and tips off the web on settings etc.....as well as forums.  The key things to focus on are settings such as aperture, shutter speed, film speed ISO, depth of field, AWB, exposure compensation and lighting.  Try and shoot with these factors in mind and move away from using the camera’s “auto” shoot modes.
7) Practice Practice and PRACTICE!! Play with your camera and test shoot on different settings.  Simply go for a walk and take pics of all sorts of things to get a feel for the camera settings.  Eventually you will find a mode you prefer shooting in.
8) Most DSLRs have a "live view" mode, it’s useful to a point but I would practice with the eyepiece, it will also save a lot of battery power
9) Buy a second battery and always make sure its charged – it’s a real pain when you run out of charge and cannot keep taking pictures!
10) A lot of DSLR cameras now can shoot stills and movie footage (top end bodies can shoot HD film).  If you were thinking of buying a separate Video Camera I would strongly advise you spend that money on a better / higher end DSLR can that can do both.  You end up getting more for your money and will carry one less item of gear in the van!


 I always get asked – what gear do you use, well the answer is as follows;

  • The workhorse is a Canon 5DMKII body (shoots HD movie and has a 20MB, full frame sensor) – it’s a semi-pro model and probably not in most people’s budgets BUT its helped me take my photography to a slightly higher level of quality than my older 350D
  • I use a small Canon IXUS for “in the pocket” quick pics / basic movie footage
  • Canon 16-35mm wide angle L Series lens
  • Canon 24-105mm mini zoom L Series lens
  • Canon 100-400mm zoom L Series lens
  • Canon 2x converter for doubling up on the 100-400mm (makes it 200-800mm)
  • Manfrotto tripod with round head and pistol grip handle with quick release mount
  • Lowe Pro Fastback 300 camera case – has laptop compartment, and is small enough to be of a manageable size while walking etc….but ca carry all my main kit & lenses
  • Hoya filters, spare battery, cleaning cloths, rubber hand pumped dust remover
  • Wireless remote for Bulb and distance self timer shots
  • Buy the BIGGEST and fastest memory card you can afford!!!!!  I use Lexar Professional UDMA CF 16GB cards rated at 300x Speed.
  • Computing: 15” Mac Book Pro laptop with 500GB HD and Iomega 500GB portable drive
  • Software: Apple’s iPhoto for all JPEG pics and Apple’s Apeture software for RAW files


Preferred shooting mode

I shoot 90%+ in Av (aperture) mode and 80%+ of my pics are B&W. They always say "photography is all about light" and its true.... the more light you let in the more you can do with the image, so controlling this is what I focus on.  My personal settings for my B&W pics are:

1) Style Monochrome
2) Switch on red filter (this is a setting in the camera.....  It mimics what the traditional filter you would have attached in the old days – great for skys / clouds / high contrast
3) Increase contrast and sharpness settings depending on what you like
4) Shutter speed is then dictated by the Av setting  - the smaller the Av number the bigger the hole in the camera and the more light you let in and the faster the shutter speed.... read up on this and have a play.... depth of field is important for people shots.... and this setting also helps controls depth of field.
5) I shoot in JPEG mode (mainly) as the camera produces very good compressed JPEG files of around 5-7MB.  You will also hear people say ALWAYS shoot in RAW format.  This depends.  If you have a high res camera you can afford to shoot in JPEG.... the 5DMKII will take a 20MB RAW file and then compress it to make a pretty large JPEG image.  This mode is suitable for most home / shop printing up to A3 and they can be edited on a basic PC using simple software.  If you want to make bigger prints or selling your images or want big blow-ups greater than A3 you will need to shoot in RAW and post process the images using something like Photoshop
6) Apart from some small contrast or exposure changes I do very little if no post processing.  I try and aim to capture the image I want there and then and when you are on the road processing 100s if not 1000s of RAW image files is a pain.  Plus, if you can find a dust free place to sit down in Africa for any length of time – please let me know ;-)

 My “dream” set up

I would love Canon’s 1D MKIV – it’s their top end pro camera and an absolute gem to use.  I would also love to have a range of prime lenses i.e. fixed focal length lenses but these tend to be expensive.  They have bigger aperture ranges letting in lots of light and made to a very high degree of quality.  The less “glass” you have between the sensor and the subject the better the image you can create.  One day eh!!


And finally.........

People take pictures NOT cameras....  the camera will do a lot of work for you but its YOU that takes the picture.  I like the quote from one my own photographic heroes Robert Capa “If your pictures aren't good enough, you aren't close enough".  Kind of sums it all up really. 


If you would like to view some of our travel pics please click here.

Enjoy!!

Nick

Stonehenge to Cape Town 2010/11

Tripods & Heads by Manfrotto

Manfrotto 055XPROB Pro Tripod Legs (Black)   Manfrotto 322RC2 Joystick Head Short 


February 8, 2011

Tracks4Africa - Submit your data & help improve this valuable resource

Hi Folks,

We at Langebaan Sunset wanted to put out a general call to action to the overland community about how you can help improve a very valuable resource.


Tracks 4 Africa has been building a complete GPS database / map for Africa for the last 10 years.  It contains many thousands of way points, tracks and routes.  For anyone traveling across Africa its a valuable aid to your trip and a very useful means for finding places that don't exist in guides or simply helping you navigate the path less traveled.

The key thing to note is that T4A is built from the raw data acquired by the overland community.  Its submitted to T4A, processed and checked and then included in the next release.  Updates can either by purchased online or by buying the map set on an SD Card.  T4A also have a Live Map on their website.

The maps are constantly evolving and you can assist by contributing your travel experience, be it for business or pleasure. The following are common types of contributions;

  • GPS track logs and waypoints
  • Place markers - if you mark a place in Google Earth
  • Photos - upload direct to the T4A website against a known point of interest
  • Comments - make a comment about a place on the T4A website
  • Descriptions - submit a description or contact details for a place on the maps 
  • General corrections - find a mistake, just let them know
If you want to learn about how you can contribute your own data set / info please visit the T4A website submit data page

T4A prefer GPX or GDB data formats for submissions but can work with most formats.  Simply compress your files using something like WinZip and e-mail it to T4A at newdata@tracks4africa.co.za.

Once submitted, your data will be entered into the T4A register and you will be notified when it has been processed.  They may come back to you with some questions if they need clarification on anything.  Once your data is processed and included in a new version of the maps, you will be asked to download this Garmin compatible map and check that your data has been processed to your liking.

Because T4A is based in South Africa, the Southern African overland / 4x4 community have really built up a lot of data for the likes of SA, Namibia, Bots, Moz etc..... and they would love to get more data on North, West and Central Africa.  So, over to you folks!

Please help T4A to continually improve this valuable resource for the benefit of those that follow you.

Thanks

Nick

Stonehenge to Cape Town 2010/11
www.langebaan-sunset.com

For some of the GPS kit we took on our trip click below

Garmin GPS 60CSx Handheld GPS Navigator  RAM Mounting Systems RAM-B-138-GA12U Flat Surface Mount for Garmin Astro 220, GPS 60, GPSMAP 60, 60C, 60CS, 60CX, 60CSx  SPOT Satellite GPS Messenger unit, Orange/Black

July 17, 2010

So, what have we learnt so far……?

The last 3 weeks have been HOT!! We peaked somewhere near 39-40’C.


Our Africa Health book says it takes 3 weeks to acclimatise to hot climates and we are still in Italy. We may write to Rough Guides and tell them that the rate of acclimatisation may more accurately be described as follows:

How Hot you Feel Index (HHFi) = T + T(X.t3) + 3(Rs) - V(Tfw)

T = Air Temperature (‘C)
X = Distance from Land Rover back door to fridge (Metres)
t = Time spent balanced over fridge whilst holding lid open because Nick put it in a poor location as advised prior to trip by everyone that knows where the fridge is located (Seconds)
Rs = Residual stress variable (No. Arguments that day)*
V = Volume of fizzy water that you can “easily” obtain from fridge (Litres)
Tfw = Temperature of said fizzy water obtained from fridge (‘C)

*Note: Not to be confused with ItYS, the coefficient of “I Told You So”

- Life in the Land Rover is very similar to life on a boat – not much space and everything has its place, if you err away from this simple rule life can become stressful – this can contribute to a high Rs with corresponding increases in the coefficient of “I Told You So”


- England still have an abysmal football team (but we knew that anyway)

- For all the negative neigh sayers before the World Cup – South Africa put on a great show! Bravo Zuid Afrika !!


- Nick picked Spain in the World Cup “On The Road Sweepstake” ;-) Hola Hola Gooooooooooooooooooooaaala!

- Italian camp sites do not appear to understand the concept of personal space – one minute you are on your own, next minute you have a big white camper van parked in front of you

- Italians will queue for a long time to acquire good ice cream, because it’s worth queuing for (this observation also applies to coffee).


- Accommodation costs have averaged £10 / day, food £5 / day and eating out £9 / day (the latter does include world cup related coffee, ice-cream & drinks). Note to self, “must resist ice-cream”

- The proximity of Vicki to water Vs electronic devices is to be monitored closely from now on. Several near misses that could have resulted in “drink entering the hard drive” have been mitigated by the implementation of the “Beverage Laptop Vicki Exclusion Zone” or BLVEZ

- Cold showers are now a daily occurrence and there is no shame in wearing a vest top (Nick has gone native) in this kind of weather – even if you do look like a tad white (correction – pink) compared to all the other bronzed men that frequent the beach.


- Small, tight (or worse still – baggy) Speedos are a BIG “no” when promenading on the beach, especially when combined with the classic “white sock / sandal” ensemble. Could someone please write a note to respective EU embassies informing them of the need to ditch the “Budgie Smugglers” ASAP.

Ciao from Italy, France & Spain here we come!

Nick & Vicki
Stonehenge to Cape Town 2010/11
www.langebaan-sunset.com

We could have spent 3 months in Italy alone!

Lonely Planet Tuscany & Umbria (Regional Guide)  Italian: Lonely Planet Phrasebook  Lonely Planet Venice Encounter  Lonely Planet Rome (City Guide)